Sunday 31 July 2016

How to cut mango in four or five parallel lines through the flesh lengthwise, without cutting the skin.

How to cut mango in four or five parallel lines through the flesh lengthwise, without cutting the skin.

How to cut a mango

Mango and coconut vacherin <a ...
We have such sweet, juicy mangoes in Australia, we should be taught in school how to cut them up properly. The problem is there's a long, flat, pit inside that clings to the flesh. 
So if you missed mango class, here's how.

Play
0:00
/
1:18
Fullscreen
Mute

How to cut a mango

Jill Dupleix shares her tips for getting the flesh from a summer mango.
Hold the mango upright, and starting 1cm out from the stem, cut off the two widest cheeks. (If the knife runs into the pit, just start again a little further out.) 
Now take each cheek and use the tip of the knife to cut four or five parallel lines through the flesh lengthwise, without cutting the skin. Turn the mango and cut parallel lines cross-wise.
Flip the mango inside out and push the cubes off with your thumb or a spoon.
With the remaining sides on the mango pit, slice them off, following the curve of the pit, and peel off the skin. 
The glass trick
If you just want mango flesh for a smoothie, ice-cream or mango daiquiri, take a strong glass, and place the lip of the glass against the edge of the mango cheek and slide it down, close to the skin.
Result: mango in glass, skin in bin – and daiquiri on the way!

More kitchen how-tos:

How to make the pavlova a day before you serve it

How to make the pavlova a day before you serve it

How to make the perfect pavlova

1. The finished product .. Rob Kabboord's pavlova
Dutch chef Rob Kabboord was introduced to this delicacy while working at London's Waldorf hotel, where he made individual pavlovas for banquets using 50 litres of egg white at a time. It's the same foolproof recipe he wrote in his notebook, which always travels with him.
We may never resolve the question of whether pavlova originated in Australia or New Zealand, but we can all agree that it's an impressive dessert, even if it does strike fear in the hearts of nervous cooks and can trip up even experienced chefs. Kabboord says the perfect pav is simply a matter of following a few rules.

Before you start:

• Make sure your whisking bowl is clean. Give it a light wash with vinegar before use.
• Have everything ready on the bench. When you start mixing the pavlova, you should not stop, unless your kitchen is on fire.
• The whole thing should take less than 10 minutes (not including cooking time) to prepare.
• Make sure the eggs are as fresh as possible.
• The egg whites must not contain any trace of yolk. Separate the eggs individually and bring the whites to room temperature.
• Use the yolks to make a delicious custard for the pav (see below).

Rob Kabboord's foolproof pavlova

Ingredients
4 egg whites (5 if you are using small eggs)
250g pure icing sugar or fine castor sugar, sifted
½ teaspoon white vinegar
1 tablespoon cornflour, sifted
Method
1. Preheat your oven to 200 degrees Celsius.
2. Prepare a baking tray by placing baking paper on it. Put a little melted butter or vegetable oil spray on the tray so that the paper will stay in one place while you are spooning the pavlova mix on to it.
3. Using an electric mixer, beat the egg whites on a medium setting until soft peaks form.
Once soft peaks appear, add the sugar all at once and beat the mixture for a minute or so on full speed. Do not stop the machine to add the sugar. It needs to be a continuous process to trap as much air as possible in the egg whites. You'll see the mixture change texture almost immediately, from loose, soft peaks to a more glossy, meringue-style mixture.
4. Turn the mixer up to high until the mixture thickens and the sugar has completely dissolved. It needs to reach the ribbon stage – when a spoonful of the meringue mixture poured back into the bowl sits on the surface like a ribbon.
5. Slow the machine, add the vinegar and let the beaters make three rotations, then remove the bowl from the mixer.
6. Sprinkle the cornflour over the egg white mixture and, using a clean spatula, gently fold in the cornflour – no more than six folds.
7. Spoon the mix on to the prepared tray and mould it into the shape you want. Kabboord prefers to leave it pretty heaped. Don't mess with the mix too much, though, as you want to get it in the oven quick smart. The other option is to use a preheated and lined tray. Speed is the key here.
8. Place the tray in the middle of the oven and immediately turn the temperature down to 120 degrees Celsius. Don't use the fan.
9. Cook for 80-90 minutes but don't let the pavlova colour. You may see a little sugar syrup seep out of the bottom but the crust should be firm. Inside, it will be soft and marshmallowy.
10. Cool to room temperature and decorate using quark, Meredith goat's curd or mascarpone (cream is boring!) and your favourite toppings, such as chopped summer fruit or passionfruit custard.
Note on storage: Kabboord says it's best to make the pavlova a day before you serve it but it will keep for up to two days in an airtight container at room temperature. Don't refrigerate it.
PASSIONFRUIT CUSTARD
Ingredients
450ml milk
145g sugar
Zest of 2 lemons (use a Microplane)
60g cornflour, sifted
4 egg yolks
60g unsalted butter, cut into small dice
4 passionfruit
juice of 2 lemons
Method
Simmer the milk, sugar, lemon zest over medium heat.
Mix the cornflour with a little water and pour this in to thicken the mix. Whisk in the yolks and simmer. Do not let it boil.
Take the custard, which should be nice and thick, off the stove. Add the butter and whisk. This helps cool the custard.
Add the passionfruit pulp and lemon juice. When cool, spoon over the pavlova or serve alongside.
Source goodfood

Saturday 30 July 2016

How to make a folder of design ideas and pictures from magazines to keep you inspired

How to make a folder of design ideas and pictures from magazines to keep you inspired

5 Ways to Cut Down on Stress During a Home Remodel

CleanRemodelC
Maybe you’ve grown just sick enough of that 1970s avocado-green kitchen to update it to something more sleek and modern. Or perhaps it’s as simple as remodeling a bathroom. Whatever the room, home renovations can test even the most patient personality through the sheer chaos and mess that are inevitable.
To get through your renovation, organizing the clutter is key. The following tips should help you stay on top of the disorder.
• Have files for everything. Paperwork should be kept in one place because it will pile up. Inexpensive file folders that are portable can help you stay structured. Create a file for all receipts, and as you post them to a budget, move them to another file labeled “posted.” Permits and papers from the city or homeowner’s association should be kept together in another folder in order to easily put your fingers on them. Just for fun, make a folder of design ideas and pictures from magazines to keep you inspired.
• Cover it up. One word: plastic. No, not credit cards. Use it to cover all heavy furniture that must stay in the room. This will prevent dust and debris from getting into the nooks and crannies and keep the finish on the furniture looking shiny.
• Keep a list. Supplies are going to run low, and no matter how good your memory, things are going to fall through the cracks if you don’t write them down. Hanging a clipboard on a nail in the area where you are working will help you to stay on point about people you need to call, or things you need to do or buy for the next day.
• Have a place for everything. If you’re doing the remodel yourself, there is going to be a certain amount of upheaval. One thing that will help reduce your stress level is keeping your tools in one place. Create a space such as a table, where all small tools are kept The larger tools can sit on the floor underneath. Also, every time you are finished with a tool, put it back in the appropriate spot.
• Contain your stress. If cigarettes or smokeless tobacco helps your stress level, try your best to keep things clean by going outside to smoke or by carrying a portable spittoon. After all, you don’t want a fresh burn mark or stain from a spill to end up on your brand-new floors. FLASR has created a unique, one-of-a-kind pocket-sized spittoon that allows users to open and shut it with just one hand, making it an ideal solution for taking your snuff, dip or chew into any room that’s being renovated. In addition, the Atlanta-based company’s spittoon, has an advanced closing mechanism, ensuring that it stays securely closed when not in use, eliminating the risk of spill and leaks often seen with cups and bottles.
For more information, visit www.flasr.com. Market listing: FLASR (OTCQB: FLSR).
Source copyrightfreecontent

How Gigabyte could easily have tossed in a small USB drive instead.

How Gigabyte could easily have tossed in a small USB drive instead.

Gigabyte Brix S BXi3H-5010 Review

HIGHLIGHTS

  • The Brix S can be mounted discretely behind a monitor or desk
  • It is sold barebones; buyers can add their own storage and RAM
  • Performance is on par with that of thin-and-light laptops


Gigabyte, one of Taiwan's top IT companies, is best known for its motherboards and graphics cards. Much like Asus, it has tried to diversify beyond PC components into ready-built products such as laptops and even accessories. However, at least in India, Gigabyte hasn't had nearly as much success breaking out of its mould. The company's relatively low-key approach means that few people even know that it sells a line of mini PCs.
We have one of those products, the Brix S BXi3H-5010, in for review today. Building on Intel's NUC concept, it's just about palm-sized but has a surprising amount of flexibility and power. If you don't want or need a full-sized PC tower but still need more than a laptop can deliver, a mini PC like this might just be perfect for you.
gigabyte_brixs_bxi3h5010_frontangle_ndtv.jpg
Look and feel
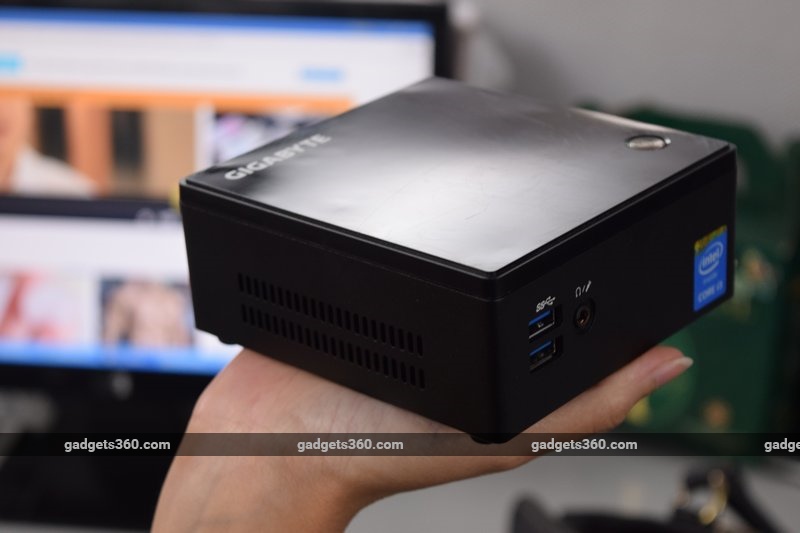
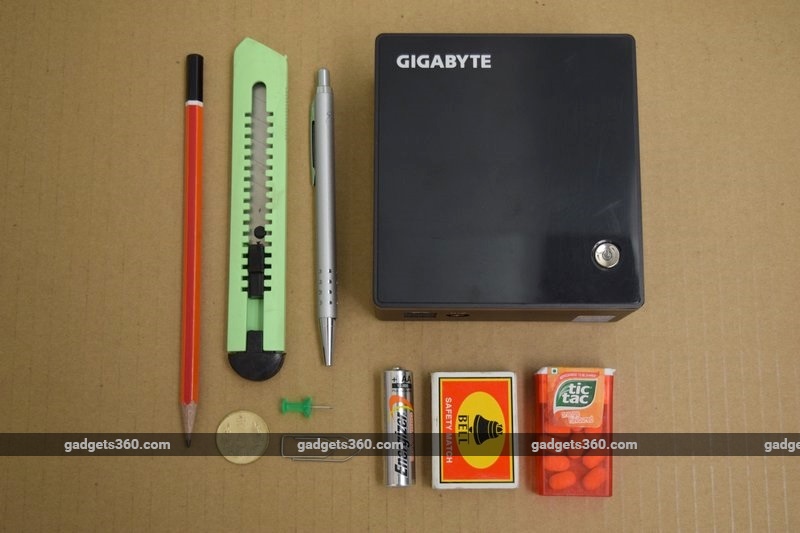
The Brix S is a neat little palm-sized black box with a glossy top. It's subtle enough to not stand out, while still looking interesting. You could place one of these on your desk - it's small enough to fit on the pedestal of some LCD monitors - or mount it in a variety of ways including hanging it off the back of a monitor or TV. It's smaller and less obtrusive than many routers and desktop hard drives, and could easily be mistaken for an accessory.
However, it does require an external power brick which is around the same size as the ones which come with mainstream laptops. You'll also have to deal with wires when you need external devices such as hard drives. At least you can use Wi-Fi and Bluetooth input devices without any dongles, making the Brix S suitable for spaces where cable clutter would be a problem, such as a living room.
gigabyte_brixs_bxi3h5010_front_ndtv.jpg
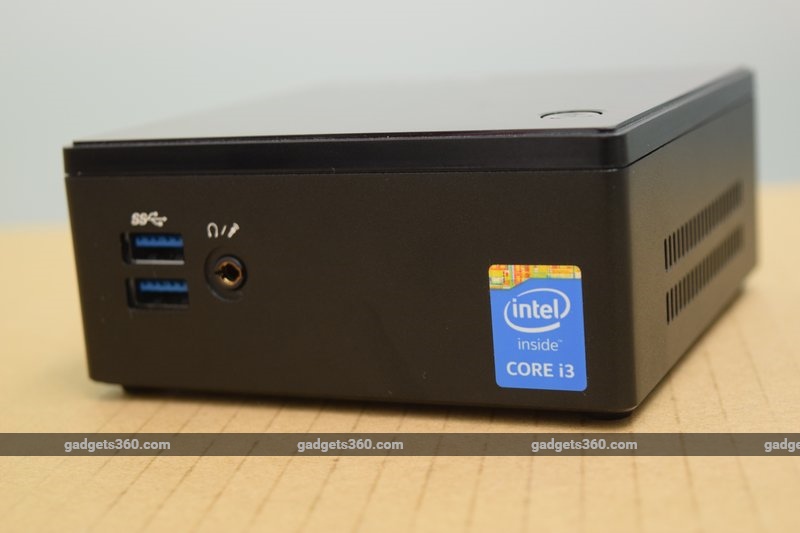
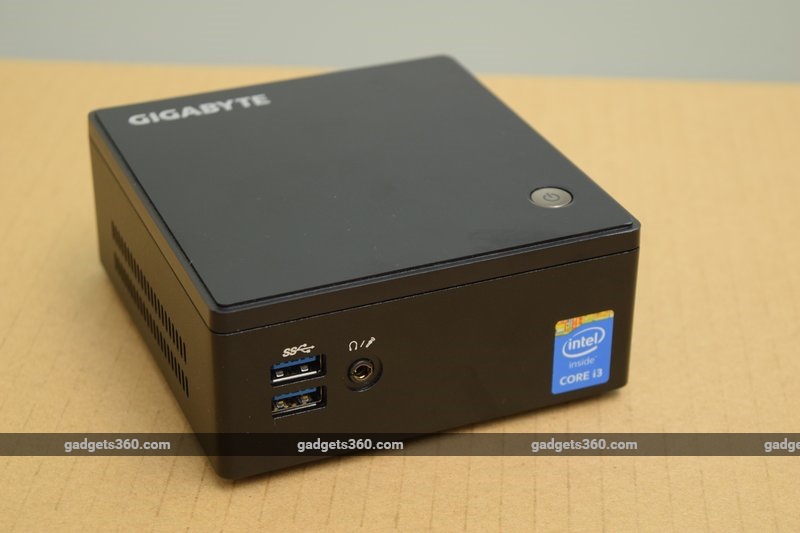
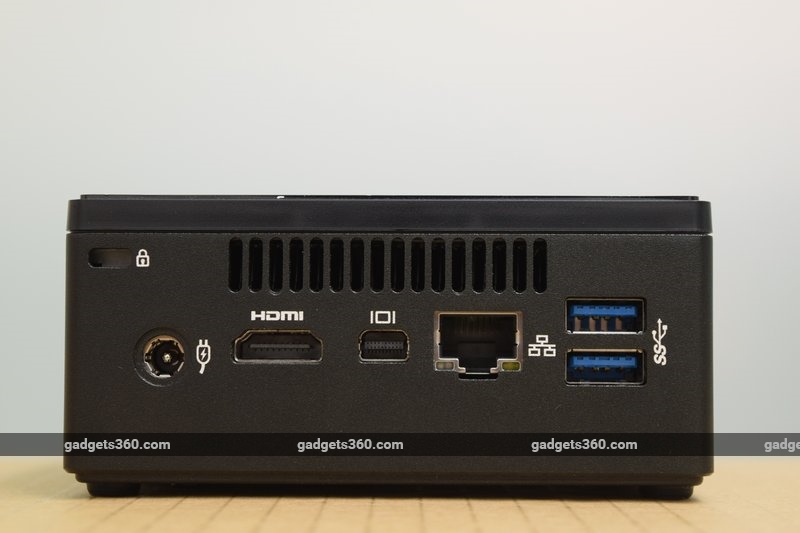
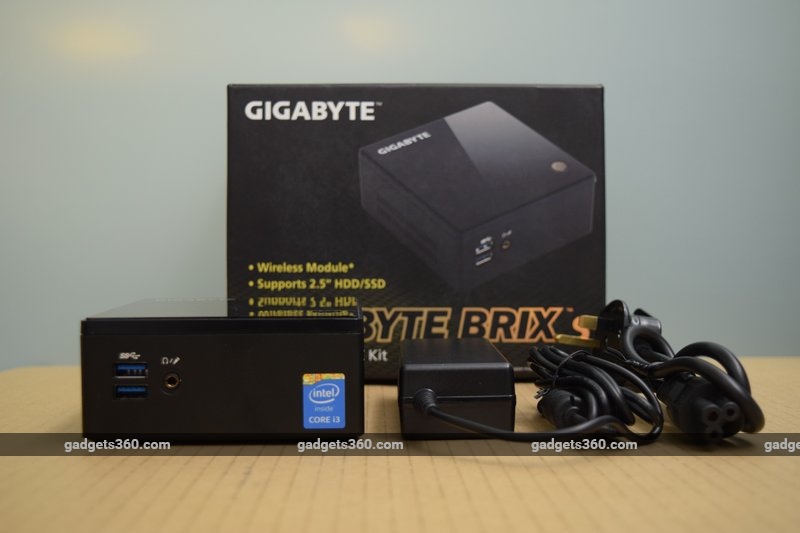
There's a Gigabyte logo towards the back of the top, and a power button nearer to the front which glows blue when the device is switched on. The front panel has two USB 3.0 ports and a 3.5mm audio socket so you don't have to reach around the back just to plug in a pair of earphones. There are two more USB 3.0 ports on the back, along with a Gigabit Ethernet port, a Mini-DisplayPort, an HDMI output, a DC power inlet, and a Kensington lock slot. That last touch is important, since a thief could just unplug one of these and slip it into a bag or jacket pocket.
We would have liked at least an SD card slot, and maybe USB Type-C keeping future devices in mind, but the Brix S does have a lot of flexibility the way it is, especially the ability to drive two displays simultaneously. You get a VESA mounting bracket and two bags of screws in the box, so you won't have trouble installing a hard drive and getting started. However, drivers are supplied on a CD which is pretty much useless - Gigabyte could easily have tossed in a small USB drive instead.
gigabyte_brixs_bxi3h5010_rear_ndtv.jpg
Specifications
Gigabyte sells multiple versions of the Brix S in India, with the most important difference being the CPU, which is soldered down and cannot be upgraded. You add your own RAM and storage, so you aren't limited on those fronts at the time of purchase or later on.
As its name suggests, the BXi3H-5010 is based on an Intel Core i3-5010U CPU, which is essentially a 15W laptop processor based on the 5th generation 14nm Broadwell architecture. It's soldered to the Brix's tiny motherboard and requires a cooling fan. The CPU has two physical cores with Hyper Threading, and runs at 2.1GHz but does not support Intel's Turbo Boost tech feature which pushes clock speeds up when possible.
gigabyte_brixs_bxi3h5010_open_ndtv.jpg
Intel's HD 5500 GPU is integrated, and should do well for basic needs. You can run two displays, but resolution support isn't the same across both outputs; only the mini-DisplayPort can handle 4K at 60Hz while the HDMI port tops out at 2560x1600 unless you don't mind the refresh rate dropping. Barebones PCs don't usually need to push such high-res displays, but it's worth noting if you're thinking of HTPC usage with a 4K TV.
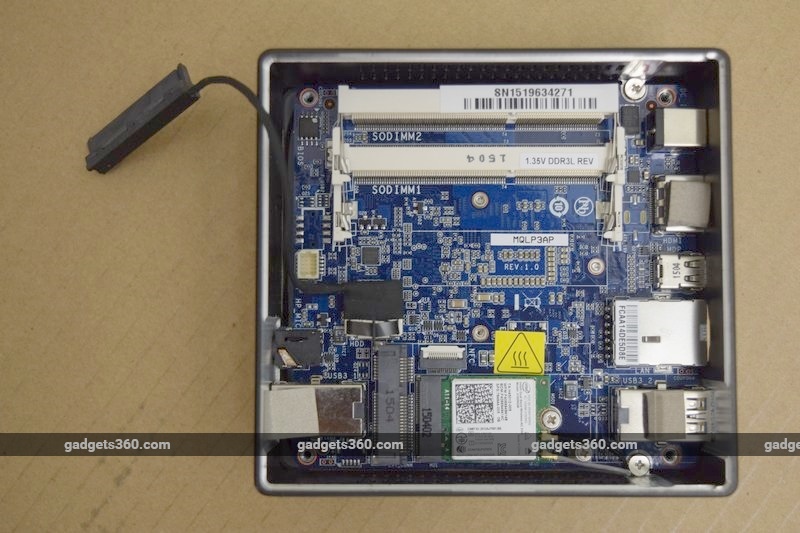
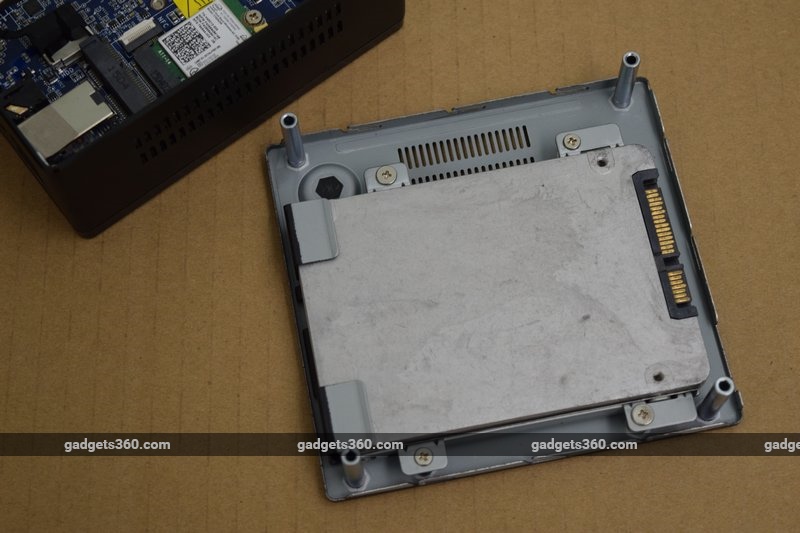
You have to add your own RAM and storage - the Brix S has two laptop-style SO-DIMM DDR3L slots which lie flat against the motherboard, and each can handle low-power modules of up to 8GB. On the storage front, you can take advantage of a low-profile mSATA slot on the motherboard as well as a 2.5-inch SATA bay on the lid. This is a surprisingly flexible arrangement, and so you can have a speedy SSD to boot from as well as a high-capacity hard drive for storing lots of files.
gigabyte_brixs_bxi3h5010_inside_ndtv.jpg
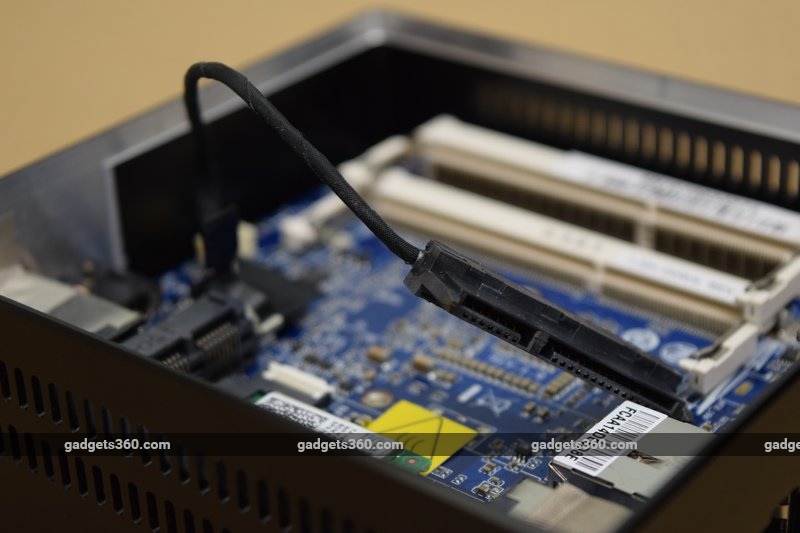
A very thin SATA cable comes already attached to the motherboard with a non-standard connector, and the 2.5-inch bay is on the removable base. You'll have to plug the drive in and stretch the wire from the motherboard to the base, and then carefully screw the two back together. We're a bit concerned about the long-term integrity of this cable, because replacements won't be easy to find.
Gigabyte also lists a few models, simply named Brix, which dispense with the 2.5-inch drive bay. These might be appealing if you're fine with mSATA storage only and want a smaller box that's easier to tuck away. There's also a PCIe-only M.2 slot which is pre-populated with the Brix's Wi-Fi ac/Bluetooth 4.0 module. The antennas are internal, and we would have liked at least the option of external ones to boost reception.
gigabyte_brixs_bxi3h5010_satacable_ndtv.jpg
Setup and performance
It's really easy to pop the base off the Brix S; all you need is a medium-sized Philips-head screwdriver. You'll see the tiny four-inch-square motherboard mounted approximately two-thirds of the way inside - this arrangement leaves space on the other side for the CPU, cooling fan, and components which don't need to be accessed. All the slots on the bottom are easy to deal with, and you could have your RAM and SSD in place within seconds.
We used a single 4GB Kingston DDR3L module (supplied by Gigabyte for the purpose of this review) and a slightly aged 160GB Intel X25-M SATA SSD to reflect entry-level hardware choices. This particular drive is 7mm thick but it fit comfortably even with its 9mm shim attached, which means that 2.5-inch hard drives will fit just fine. Installing an SSD is a bit difficult thanks to the tiny screws provided and relatively awkward mount placement, but this is usually a one-time job.
The Brix S's BIOS is a surprisingly old-school text-only affair, and hopefully you won't have to deal with it much. Options include the ability to turn power on via a USB keyboard which is nice if you're planning to mount the Brix S out of reach behind a monitor or desk. Hopefully, you have a monitor or TV with built-in speakers or at least a 3.5mm passthrough for sound coming in over DisplayPort or HDMI. If not, you'll have to have an audio wire plugged into the front of the Brix S at all times.
gigabyte_brixs_bxi3h5010_ssdbay_ndtv.jpg
We installed Windows 10 off a USB drive and downloaded all the latest drivers from Gigabyte's website. The Brix S booted within seconds and had no trouble running day-to-day tasks. We were pleased to note that its fan was never loud enough to be noticeable. We felt a persistent sluggishness at first when launching apps and opening files, but soon discovered that this was down to our HDMI-connected 4K Asus PB279 monitor defaulting to a 29Hz refresh rate even at 1920x1080. Not many people would dig through four levels of Windows dialog boxes to identify this problem, but it is a big deal. When we manually raised the refresh rate to the standard 60Hz, the difference was like night and day, and responsiveness improved dramatically.
4K video plays smoothly with CPU usage barely ever exceeding 15 percent, but you won't be getting the full experience since you can't do 4K at 60fps over HDMI . This tells us that the Core i3 version of the Brix S mini PC isn't suitable for HTPC use with 4K TVs. If you have a more modest full-HD screen and don't mind 4K videos being downscaled, you should be fine.
gigabyte_brixs_bxi3h5010_size_ndtv.jpg
We ran a number of benchmark tests, although keep in mind that performance will vary greatly depending on what kind of RAM and storage each Brix S is outfitted with. PCMark 8 gave us 2,326, 2,295 and 2,954 points in the Home, Work and Creative tests respectively. POV-Ray ran its benchmark in 9 minutes, 43 seconds, and CineBench R15 cave us 209cb points in its CPU test. These numbers are on par with what we've seen from current-day thin-and-light laptops such as the Asus ZenBook UX303UB. We had no problems handling multiple heavy Web pages, Office documents, and media files in common formats.
Graphics scores were on the low side - 3DMark warned us that there might not be enough graphics memory to run the base Fire Strike test, but it did ultimately finish with a score of just 500. Unigine Valley was choppy at the Medium quality setting at 1080p, and we recorded an average of 7.8fps. We tried running the extremely light Tomb Raider (2013) but were disappointed with the averages of 11.5fps at 1920x1080 and 21.3fps at 1366x768, even with the quality turned down to Normal. If you want to play 3D games, you're going to need to step up to the higher configurations.
gigabyte_brixs_bxi3h5010_box_ndtv.jpg
Verdict
We're very pleased with the Brix S overall, based on its price and its capabilities. This is no high-end compact gaming desktop or HTPC, but it is a solid machine for productivity. You could outfit a school's computer lab, provide desktops for office workers, or even come up with creative mods and projects using it. Home users can surf the Web, enjoy HD movies and music, and get all their work done without needing a hulking desktop tower.
The Brix S is more upgradeable than a similarly configured laptop, and you have the pleasure of using a large monitor and a regular desktop keyboard and mouse. It's also incredibly portable. You'll have to factor in at least another Rs. 5,000 for a reasonable amount of RAM and storage, plus the cost of a monitor, keyboard, mouse, and OS license if you don't already have them. You could also pay more for the models with a Core i5 or Core i7 processor. If you like what Gigabyte has to offer with the Brix S, keep in mind that Asus, Zotac and Intel itself have similar products on offer, so shop around and choose the one that's right for you.
Price: Rs. 22,500 (Core i3)
Pros
  • Small and unobtrusive
  • Looks good
  • Flexible RAM, storage and connectivity
  • Easily upgradable
Cons
  • Slightly convoluted setup process
Ratings (Out of 5)
  • Design: 4.5
  • Performance: 3.5
  • Value for Money: 4
  • Overall: 4
  • Source gadgets.ndtv

How to create a US account on iTunes

How to create a US account on iTunes

Pokemon Go iOS: How to Download Pokemon Go for iPhone, iPad

HIGHLIGHTS

  • Pokemon Go for iOS is available via App Store.
  • You need to create a new Apple ID.
  • It is a free download, no credit card needed.


It is quite easy to download and install Pokemon Go on Android, but plenty of readers have written to us asking for a way to download the game on their iPhone. If Pokemon Go is available in your region, all you need to do is head to the App Store and download the app. The catch is that it's only been officially released in a handful of regions.
If it is not available in you region, you can still install the game, but the process is slightly longer. You'll need to create a new Apple ID for a region where Pokemon Go is officially available, such as United States. Follow these steps and you should be able to download and install Pokemon Go on your iPhone no matter where you live.

How to create a US account on iTunes
  1. Create a new Apple ID at this page.
  2. Choose United States from the drop-down menu while creating your Apple ID.
  3. On your iPhone open the App Store. Tap Featured on the bottom panel.
  4. Scroll to the bottom and tap your Apple ID.
  5. Tap Sign Out if you are already signed in.
  6. Next, tap the Sign In button.
  7. Key in your new Apple ID and password.
  8. You'll see a pop-up that reads "This Apple ID has not yet been used in the iTunes Store". Tap Review.
  9. Tap United States under COUNTRY OR REGION. Tap Next.
  10. Read the terms and conditions and Apple's privacy policy and tap Agree.
  11. Tap Agree again in the pop-up.
  12. Under BILLING INFORMATION tap None.
  13. Scroll down and key in a valid US address - search the Internet!
  14. Key in a phone number. Then tap Next.
  15. Tap Done on the top-right.
(Also seePokemon Go Review)

How to download and install Pokemon Go on iPhone


  1. Now that you have a US account, just tap the Search button on the bottom panel.
  2. Search for Pokemon Go or tap here.
  3. Tap Get to download and install Pokemon Go on your iPhone.
Once you've installed the app, repeat steps 3 to 7 above to switch back to your primary Apple ID. The game will still work even after you switch the ID, although you will have to return to your US iTunes account to update the app.
Did you install Pokemon Go on your iPhone? Are you enjoying the game? Let us know via the comments. For more tutorials, visit our How To section.
Source gadgets.ndtv

Friday 29 July 2016

How To sureshot way to catch Pikachu

How To  sureshot way to catch Pikachu

Pokemon Go: How to Catch Pikachu

HIGHLIGHTS

  • Pokemon Go is available for free on Android, iOS
  • Pikachu is an uncommon Pokemon in Pokemon Go
  • This is the only sureshot way to catch Pikachu

If you've seen the Pokemon animated series, you probably have a soft spot for Pikachu, who is protagonist Ash Ketchum's favourite Pokemon. There are many Pikachu fans who haven't been able to find it in Pokemon Go. It's a rare Pokemon in the game, and this guide offers the only sureshot way of catching it.
(Also seePokemon Go Review)
The bad news is that it only works for new accounts. If you've already been playing the game, you'll have to start over with a new Google account or create a new Pokemon Trainer Club account. If you don't mind starting over, follow these steps.
  1. Download Pokemon Go on Android or Install Pokemon Go for iOS
  2. Sign up with a new Google or Pokemon Trainer Club account.
  3. Professor Willow will offer you a choice of three Pokemon - Squirtle, Charmander, and Bulbasaur. Ignore all three and walk away.
  4. When you are sufficiently far from them, the same three Pokemon will spawn again near you. Ignore them again and walk away.
  5. Repeat this step at least twice more and you'll notice that Pikachu has appeared alongside the aforementioned three Pokemon.
  6. Tap on Pikachu, throw the Pokeball and catch it.

The number of times you need to walk away until Pikachu spawns varies. We tried this with two new accounts and once it appeared after we ignored the original three Pokemon four times and the other time it appeared after we ignored them five times. Just be patient and make sure you ignore the original Pokemon no matter how tempting it might be to start catching them.
There's a small chance that you'll find Pikachu in the wild but it is definitely not common. If you're really attached to it, then this method is probably your best bet to catch it.
Did you catch any of Pikachu, Charmander, Squirtle, or Bulbasaur in the wild? Let us know via the comments or post where you caught it on our forum. For more tutorials visit our How To section.
Source gadgets.ndtv

Thursday 28 July 2016

How to Stay safe by using a VPN and avoiding rogue networks

How to Stay safe by using a VPN and avoiding rogue networks

The Dangers of Free, Public Wi-Fi - and How to Keep Yourself Safe

HIGHLIGHTS

  • Public Wi-Fi networks are a boon but can also be a threat if not careful
  • Most common attacks include man-in-the-middle, malware, and spoofing
  • Stay safe by using a VPN and avoiding rogue networks

Imagine this scenario: you've just landed in a new city. What's the first thing you would think of doing? Head to the luggage belt? Visit the washroom? No - it would typically be scanning for free Wi-Fi networks at the airport. It's sort of an automatic reaction that has developed ever since the smartphone boom.
It's not just airports, though, as today, you can find free Wi-Fi pretty much everywhere - in malls, coffee shops, public transport, restaurants and in 2016, we're going to see this increase ten-fold with big conglomerates like Google as well and the Government stepping in to make public Wi-Fi ubiquitous in India. It's a great idea and one that's been widely praised.
However, one of the pitfalls of public Wi-Fi is that it's easily open to attacks from hackers. According to toNorton's Cybersecurity Insights Report, millennials seem to be the most vulnerable to attacks as most of their work, business, and socializing is done online. The report also found 77 percent of Indians would be devastated if their personal financial information was compromised and around 52 percent have experienced credit card fraud or know someone who has.

Jagdish Mahapatra, Managing Director for Intel Security, India, and SAARC, tells Gadgets 360 that the firm's recent study for India highlighted that diet or fitness related promotional links are something that cybers criminals run on a regular basis. He also states that 78 percent of Indian consumers consider dangers of unsafe online search terms but click on promotional diet [weight loss] links. That said, 44 percent of survey respondents have purchased a service or product from a promotional link without knowing whether or not it's a secure site. Many respondents reported their willingness to share information like an email address (79 percent), full name (72 percent) or age (53 percent) with a website, service or company in hopes of reaching their goal weight or dream body.
How can a hacker get your data?
The biggest problem with public networks is the lack of authentication. To join a free network, you typically have to tap the desired icon, enter some credentials like your mobile number in a browser window (if at all) and you're good to go.
There isn't any password required to join as you would normally have at home or in private networks. This means anyone can join the network and start tapping into your information very easily. In fact, Mandar Bale, Strategic Business Manager at FireEye, tells Gadgets 360 that even browser plugins like Firesheep have demonstrated how easily Web sessions can be hijacked in order to steal credentials.
The most common type of attack, he explains, is known as the man-in-the-middle attack. Here, the hacker is able to exploit a security flaw in the network to position himself between you and the access point. Bale adds that devices such as Wi-Fi Pineapple make it very easy to perpetrate such attacks. This way, all the information that's passing between you and the Internet is first intercepted by the hacker.
Dangers_public_Wi-Fi_attack_ndtv.jpg
By sniffing the data, the hacker can potentially recover your financial data, passwords, account logins and other sensitive data that you might have. This could also lead to identity theft if you're not careful.
Sidejacking is a form of hacking where an active Web session is compromised by intercepting the credentials of the user, says Altaf Halde, Managing Director South Asia, Kaspersky Lab. This method mostly works on sites that require a username and password such as mail accounts, social networking sites, to name a few.
Rogue networks are another threat to watch out for. In public places, you'll often notice many unsecured networks, among which, some of the names might look similar with slight variations. While one of them would be legitimate, the other could be a rogue access point set up by the hacker to lure an uninformed user. These hotspots will typical have names like "Free Wi-Fi" or mimic closely the name of a popular coffee shop or restaurant, thereby fooling unsuspecting users.
Hackers also typically use unsecured connections to spread malware. On a computer with file sharing enabled, this is easily achievable if you connect to a spurious network. According to Kaspersky , hackers have even managed to hack the connection point itself, causing a pop-up window to appear during the connection process offering an upgrade to a piece of popular software. Clicking the window installs the malware.
With this many risks, it's not a surprise that Sunil Sharma, VP Sales, Sophos India and SAARC, describes joining a public Wi-Fi network as "stepping into a black hole". And as he points out, even if you're not a senior corporate executive, it doesn't mean your data is worthless - even a student needs to stay alert and aware.
How to stay safe on public Wi-Fi?
Despite the looming threats out there, don't let this put you off public Wi-Fi. Halde suggests, "It's a good idea to avoid logging into websites where there's a chance that cyber criminals could capture your identity, passwords, or personal information - such as social networking sites, online banking services or any websites that store your credit card information."
Rana Gupta, Vice President (Identity & Data Protection), APAC, Gemalto, suggests disabling file sharing on your laptop when connected to a public Wi-Fi hotspot. He says, "while one can safely keep data in sharing mode when using a private network which is secure, one must disable network sharing option on their smartphones and laptops when on a public Wi-Fi network which will prevent hackers from accessing their data."

In Windows, you can find this under Network and Sharing Centre in Control Panel or System Preferences ->Sharing if you're using a Mac. It's also recommended to turn on the firewall for both OSes. Another good practice would be to use the "Forget network" option for public Wi-Fi networks or delete it once you're done using it, in order to avoid automatically connecting to it the next time you're in the area.
Dangers_public_Wi-Fi_cover_ndtv.jpg
It's also important to keep your software patched to the latest versions, whether you're on a laptop, smartphone or tablet. Hackers are constantly trying to find loopholes and vulnerabilities for your devices, to which manufacturers keep releasing new firmware and updates to fix this. So, the next time you get a notification for an update, don't ignore it.
Sometimes, even seemingly safe apps have been known inadvertently leak information. A recent investigation by FireEye revealed a popular camera app called Camera360 Ultimate which accidentally leaked sensitive data which could give malicious parties unauthorized access to users' Camera360 cloud accounts and photos. This issue has been fixed in the latest version of the app. Hence, it's best to limit your usage of third-party apps, especially when on public networks.
Sophos' Sharma also suggests that when you're traveling, invest in a local SIM so you can use mobile data, instead of being completely reliant on Wi-Fi. He also recommends that users encrypt their data. "Assuming you still go ahead and connect to an open Wi-Fi, look out for a padlock symbol on your browser," he adds. "The lock symbol indicates that your connection to the website is encrypted, which is important for your security and privacy. If it's missing, exit immediately."
The simplest solution, of course, would be to just stick to your data plan but if you absolutely must use a free Wi-Fi network; then do use a VPN or virtual private network, to get your work done. This way, even if a hacker manages to sniff your data, it will be heavily encrypted.
If you're using Windows, Opera's latest developer build offers a free built-in VPN service within the browser which requires no setup. Total VPN and CyberGhost and a couple of other popular services that you can try too. Enabling two-factor authentication is another way to protect your login details.
Of course, there are no absolute guarantees when it comes to safeguarding your privacy, even with precautions in place. That's just one of the side-effects of living in a heavily interconnected world. Staying vigilant and restricting the type of activities you conduct when you're out of the confines of your home network will go a long way in ensuring your safety on the Web.
Source gadgets.ndtv